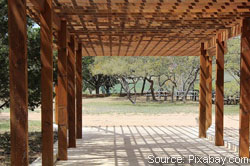
An arbor (sometimes called a pergola) is a nice feature to add to any garden or yard. There are many different types of arbors you can go with, and oftentimes you can simply purchase and install a premade one. On the other hand, if you're a confident do-it-yourselfer, building an arbor can be a fun project to undertake. Since there are many styles you can go with, the construction process will vary. You might want to build something simple, or you may have a more complex idea in mind. If you want to do something a little more complex, you might consider purchasing a kit from a home improvement store. This guide will give you instructions on how to build something simple.
First Things First
 Before you start building anything, find out what the legal requirements might be. You may need to obtain a building permit, even for something as simple as an arbor. Also, contact your local utilities; you'll most likely be digging postholes and you don't want to hit any power lines, water lines, etc.
Think ahead about what you want your arbor to look like. You won't want it to be too tall and skinny or too wide and short. If it's going to be over a garden path or used as an entrance to a part of your yard, make sure it's a comfortable size to walk through.
Building an Arbor
Instead of giving you specific instructions with specific lengths of wood, this guide will give you a general idea of how to build an arbor, and allow you to tailor it specifically to your needs. One note, though, before you get started: keep in mind that if you're building your arbor over a concrete patio, you'll need to find a way to anchor the arbor posts to the patio. One way is to purchase post anchors at a local home improvement store and drill holes for them in the concrete. Now, onto the arbor construction!
First, you'll need to dig postholes and set the posts. Dig the holes as deep as the frost line is in your area. Then fill each hole with 6 inches of gravel. Set the posts in place and pour concrete in around them. Fill the hole to about 2 inches above ground level, and slope the concrete away from the posts. This will help to divert water. Allow the concrete to dry before moving on.
Make sure all your posts are of equal height and that they are plumb and level. You want your arbor to be comfortable for anyone to stand under, so your posts should be at least 7 or 8 above ground. One way to make sure your posts are of equal height is to set them in place and cut the excess height from the top of each post. Measure and cut one of the posts, and then use a plumb line to mark and cut the others.
Next, install the two tie beams. These will run parallel to each other across the tops of the posts. You may wish to have these overhang the posts. If you do, just make sure you measure so that the overhang length is equal on both sides of both beams. You may also want to decoratively taper the overhung edges.
The rafters will come next, followed by the crossbeams. The rafters will stretch between the two tie beams and be evenly spaced. The crossbeams will stretch across the rafters (parallel to the tie beams), and again, they should be evenly spaced. You can use finishing nails, screws, or whatever method you like to attach all these pieces, as long as the connection is sturdy. If it's not, the whole thing may come down on a windy day.
All that's left now is to paint or stain!