Composting, while not a new idea, has become more popular in recent years. Composting helps improve the quality of the soil, food and the planet. With more and more people moving toward a "grow your own" concept, the idea of composting is becoming an important part of the
gardening routine.
What is composting?
Composting is essentially nature's way of managing waste and putting them back into the ecosystem. When anything that was once alive (grass clippings, trees, fruits, etc.) are combined and left to sit the end result is rich, fertile soil otherwise known as compost -- compost that can be used to fertilize your own gardens and lawns naturally without chemicals. Composting also helps
reduce the amount of food waste that gets sent to landfills an/or ends up in waterways.
Composting requires four "ingredients" which are air, moisture, carbon and nitrogen. Carbon will come from the "brown" material and nitrogen will come from the "green" material.
- Brown: plant-based materials such as dead leaves, branches, twigs, newspaper and unbleached brown napkins
- Green: grass clippings, fruit and vegetable scraps and coffee grounds
How do you start composting?
Composting is not a complicated process and anyone can start composting themselves -- yes,
even apartment dwellers.The first thing you'll need to do is designate an area as a compost pile or compost bin. If you're going to be setting up a compost area outside you can do it one of two ways: build a compost bin or just create and maintain a pile.
Outdoor compost pile:
- Choose a spot that is dry, shady and near a water source like a spigot. Look for a spot that's about three feet wide by three feet tall away from your garden just in case it attracts pests who might want to eat the food you're growing.
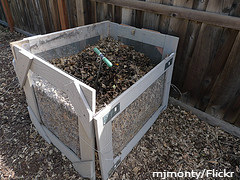
- You can give the pile some structure with chicken wire, snow fencing or you could nail scrap wood together and make a box.
- Add in browns and greens in equal parts as they're collected, making sure to break up larger sticks and newspapers.
- If the bottom layer of material is dry when you add it, moisten them, don't soak them.
- Once everything starts decomposing, mix in grass clippings and more greens including fruit and vegetable scraps (try to bury the food scraps under the decomposing materials).
- Every time you add in new material, mix the pile by turning it with a pitchfork to help with aeration.
Outdoor compost bin:
The process to create an outdoor compost bin is similar to the pile except that it takes place in a container. You can purchase a container from a number of online websites or you can build your own out of a large trash can.
- Buy a large garbage can with handles and a locking lid.
- Drill holes into the garbage can lid and around the can itself for aeration purposes.
- Attach the garbage can to a platform of some kind to allow for drainage and to protect your grass from burning.
- Once your garbage can is attached to the platform and has enough holes in it, you can begin adding in your composting materials.
- Every week, turn the bin on its side to mix the composting materials together.
Indoor composting
It is possible to compost indoors and if done correctly, it won't attract pests or smell. You can purchase indoor compost bins that can do all the mixing work for you, or you can make your own.
- To make your own, you would follow a similar process as far as adding the clippings and the bin itself--it's just a smaller version of the outdoor bin. You'll need to decide on where you plan on keeping your indoor compost bin-- many DIY composters keep theirs under the kitchen sink so they can easily add in food scraps. If you have a garage, you could also keep it there.
- Once you've decided where you plan on keeping your compost bin, you'll need to choose a container. Metal or plastic bins with locking lids are recommended.
- Drill holes throughout the container for aeration. As an optional step, you could purchase carbon filters and glue them to the lid of the container to neutralize any odors that may escape from the bin.
Because the bin will be indoors, it's even more important to maintain the correct ration of green to brown material so that it doesn't start to smell.