When you're planning for a move, you have two options; either you'll need to pack your belongings yourself or you'll need to pay for any moving company. However, packing your belongings is expensive, so if you have extra time to spare, you can easily make your very own cell box to pack your fragile glassware and stemware. Here are some steps to follow to prepare a cell box for packing fragile items like glassware and stemware.
Packing materials required to prepare your cell box
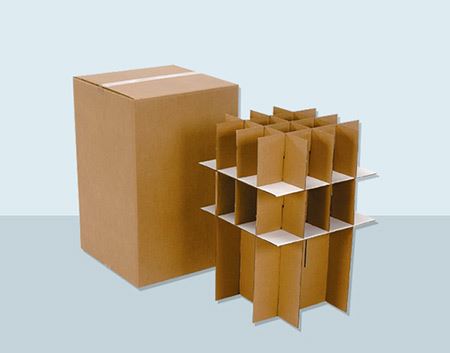
- A cardboard box with closure flaps still intact. If you purchased a new cardboard box, great! If you opted to find used boxes, just be sure the cardboard is dry and strong to avoid any mishaps.
- Cardboard sheets or any office supply box that you will cut up to make your cells.
- Scissors or a box cutter will be used to cut the cells once you have broken down your box.
- A pen or a pencil will be used to mark where you will need to make cuts on the panels of cardboard.
- Measuring tape to measure the dimensions of your packing box.
- Packing paper to wrap your glasses and cushion any empty space in each cell.
- Packing tape to seal your box shut.
Preparing your cell box
- Take measurements of the box you'll be packing your glassware in - length and width. This is to ensure that the box you will be using to cut up and make your cells will fit snugly inside your packing box.
- Break down the box you will be using to make your cells - if you have pieces of cardboard already broken down, go to step 4.
- Cut the box into pieces depending on how many cells you need using the measurements for the length and depth of the packing box, and then cut three or more pieces using the measurement for the width of the packing box.
- Place one row of your glassware along the length of the box, then place the short pieces of cardboard in between each glass to act as a divider - this will be the base of your cell.
- Place one of the longer pieces on top of the short pieces, and mark where they intersect with a pen or pencil.
- Cut along the notches you have just made using your scissors or box cutter, taking care not to cut through the cardboard completely. Just make sure that long piece of cardboard will interlock with the shorter pieces without sticking out above the packing box.
- Repeat step 6 for all length-sized cardboard pieces you have already cut.
- Assemble the cells by sliding each length-sized piece of cardboard down the shorter pieces, until they are all interlocking tightly.
- Now, wrap your glasses in packing paper before placing into individual cells. You should lay the glass on its side and roll some packing paper around it, balling the top of the paper inside the glass.
- Repeat wrapping for each glass, and place in each cell as needed.
- Fill any empty space with additional packing paper to ensure your glassware will not jostle in transit.
- Seal the box with packing tape, and label it clearly.
If it seems like tough for you, you can buy a cell box from any retail store or hire professional packers and movers to help you. It's always a good idea to hire a professional moving company to help you with your move. Here, at Movers.com, you'll find seven moving companies with a no-obligation estimate. Just fill out the form and get more information on our quotes and services.